Showing posts with label edits. Show all posts

Thursday, June 21, 2012

-- Edits --

I LOVE editing. And I LOVE seeing before and after shots by my favorite photographers. Which is why I can never pass up a chance to link-up when the theme is related to editing. :)

This time I'm entering this contest.

I can only enter one before and after set, but I have several to share :) I'm entering the first one.

To see the before, roll over the image.

alternate text

alternate text

alternate text

All three images were taken at Ocean City, NJ last week and edited within the last week.

Wednesday, May 23, 2012

Behind the Scenes

So it's been awhile since I shared before and after photos. Since I bought lightroom 3 last January, I've learned a lot in the editing field and so I decided to share three of my favorite edits with you all today. 

Here's the first one. You may remember this picture from this photoshoot. But here's the before and after. Just roll your mouse over the picture to see the before:
alternate text

And here they are side by side:


Next is from the self portraits I did a few weeks ago. Once again, roll over the photo to see the before:

alternate text


And side by side:


And the last one I'll share is a picture I took yesterday of Rosie. {Roll over to see before image}
http://farm9.staticflickr.com/8005/7253813774_b4a5c44bc0_c.jpg

alternate text


{And in case anyone was wondering, I used this amazingly, simplistic tutorial to enable the image roll-over effect. And I used this helpful tutorial to get the images side-by-side.}

~Mary Kate

P.S. I was so excited to share this post with you that I published this one today instead of the one I had already had ready :)

Thursday, April 26, 2012

Pages

{from our family scrapbook I've been making}


~Mary Kate

Friday, February 3, 2012

Project 12

I never got around to starting a 365/366 project this year, but I still wanted to have some sort of photography project/challenge to do throughout the year. Which is why I'm introducing....


This is a monthly project (hence the 12) where each month my photography theme/goal will change.  For 25 days out of each month I have to take a photo or more that follows my theme.


Technically I didn't have a theme/goal for January, however I had lightroom 3 trial for the whole month and I played around with editing a lot so I'm saying that my January theme/goal was editing.

Two examples (roll over the image to see the SOOC shot)


But I do have a February theme.And it's food. I really want to get better at food photography and now that I have my 50mm lens I don't have my old excuse of bad kitchen lighting. :)

Here is what I have so far:

1/25 {2.1.12}
(I made these following this amazing recipe: Cookies and Cream Cupcakes)


2/25 {2.2.12}

And in the topic of food photography I have two photos from January to share:

I added a Project 12 button to my sidebar in case you want to join in on the fun. {And don't forget to grab my brand-new blog button also located on my sidebar}.
~Mary Kate

P.S. Thank you for all your sweet comments on my watercolor paintings.

Saturday, January 14, 2012

Etsy Inspiration

Today I was on etsy looking at different photographic prints for sale because I'm considering opening an etsy store. I came across a ton of gorgeous photos but one store in particular caught my eye and I love, love, love the photos in this store. {Her beach photos are my favorites.}

Anyway as I was looking through her beach photos and then other beach photography, I started to wish I had such amazing beach photos. And then to my delight I remembered that I still had several beach photos from last summer that I had never done anything with. So I transfered the ones I wanted to use from the family pc to my laptop. The photos I saw on etsy inspired me to edit these photos a little differently than I normally would and I love how they turned out!


I can't believe the photos above were ones I overlooked when I was sorting through my beach pictures in the summer {by the way these are from Ocean City NJ in case any of you were wondering}. I guess it shows you how changing up your editing routine can make a BIG difference.

This next photo was actually taken in June 2010 at Ocean City, NJ with my previous camera (a Kodak Z918 - which is just a more advanced point&shoot). Here's the originial, SOOC shot:

 And here is the edit inspired by beach photos found on etsy:
 {Linking up this before & after at Follow God Every Day}

You can't even tell it was taken with a point&shoot! I'm so glad that I my editing skills have improved because I definitely couldn't have edited it like that a year ago.
And another one taken with my point&shoot:


 And another beach before and after:
 And the whole edited picture:

I know I've shared the below photo before but it was one of my favorites from the summer but I wanted to try editing it similarily to the above photos so I re-edited and decided to share the before and after:
And this is what it looks like {already edited once but "before" this newest edit, I don't have the original on my laptop}:


What do you think? Do you like this editing or do you think it's a bit much?

~ Mary Kate

Saturday, September 3, 2011

Editing 101

In case you haven't figured it out already, I love editing. And I love good editing. In fact after having nice equipment and a good eye, I believe having good editing skills are what really make a photo pop. I'm not the best at editing, and I'm still getting better at it every time I edit. And I don't have any editing software, but picnik.com has become very useful. I wanted to share so major before and afters. A lot of the pictures I take only take a small amount of tweaking, but every now and then a certain picture needs a lot of help and it ends up looking sooo much better. 
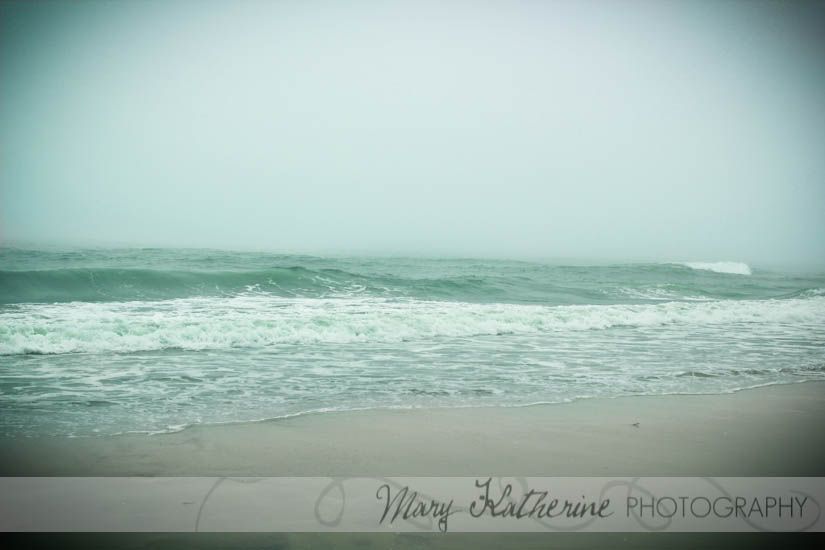
The first one I'll share was taken a week ago when we went camping on the Chesapeake Bay. And I'm using this one for:


 While we were driving over a bridge I snapped this photo through the car window:
 I loved it when I was looking at it on my camera, but I knew I could make it better with some editing. And I was right. This is what happened after editing:
I don't remember exactly how I edited but I'll try to go over everything:
1) I used the clone tool to get rid of the black spot in the upper right corner (from the car window)
2)I then adjusted the levels until I liked it.
3)With the levels adjusted I realized the overal image had too much green in it, so I went back to levels and clicked on the green, and changed the green level to allow for more blue and white.
4) I then played with the blue levels
5) then I used the sharpening tool to sharpen the clouds, reflection and grass
6)  I used the airbrush tool to smooth over the sky
7)lastly  I added my watermark

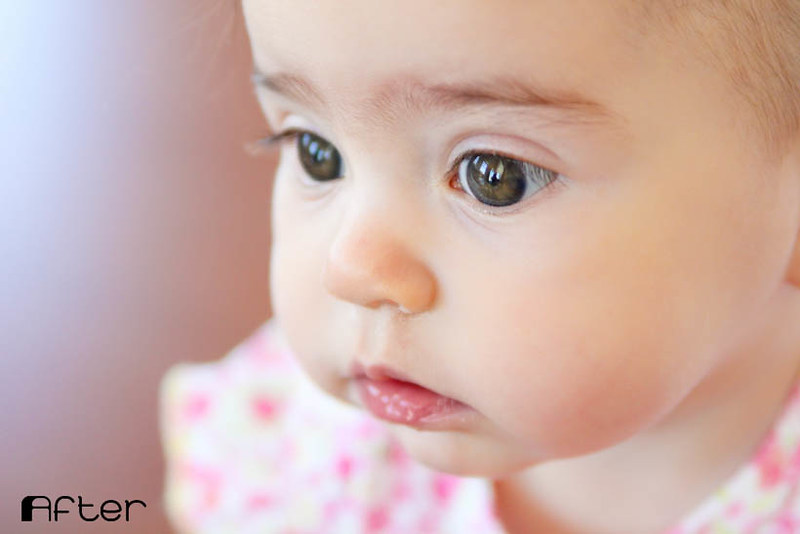
The next photo is my two youngest brothers, Ben and Joe {4 and 18 months}, and was taken in July in our kitchen  which has horrible lighting. SOOC:
The image was too red, noisy and dark. After editing:

Much better! Basically I follow the same pattern for each image:
1) adjust the levels until the image looks right
2) adjust the colors until the colors are natural
3) brightened their eyes
4) airbrushed the background on "strong" to get rid of most of the noise
5) airbrushed their skin on "light" to smooth it out and lose any noise.
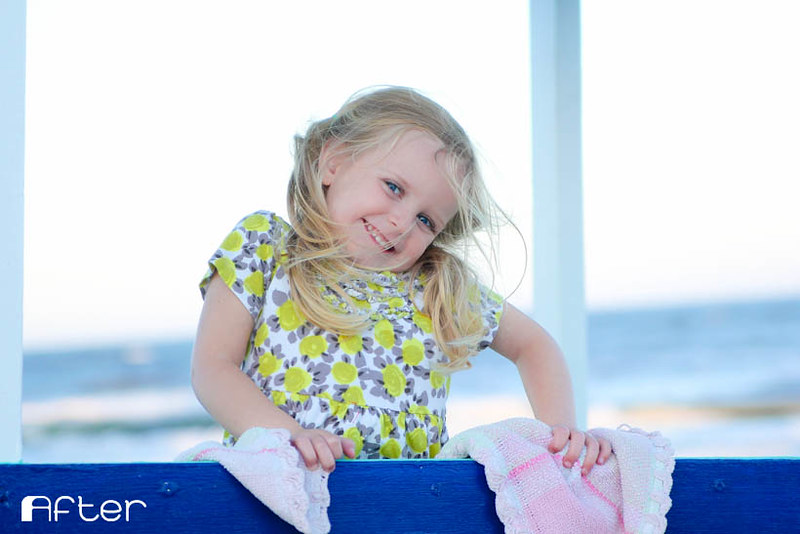
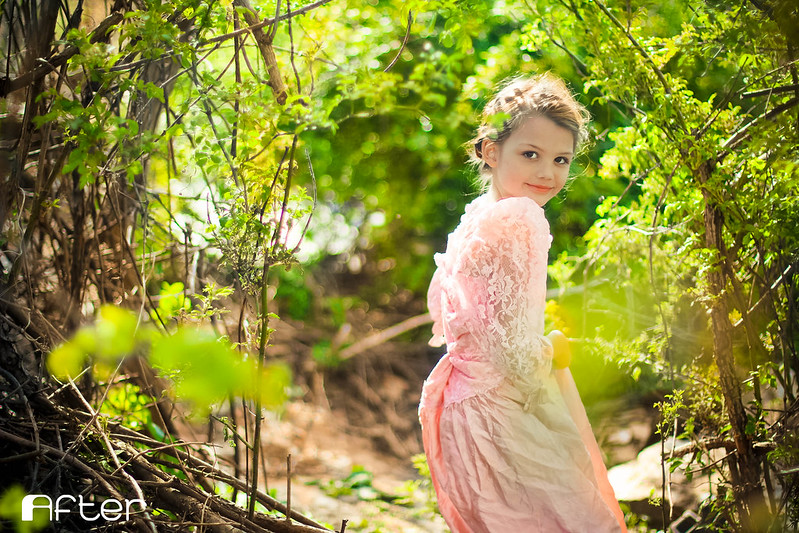
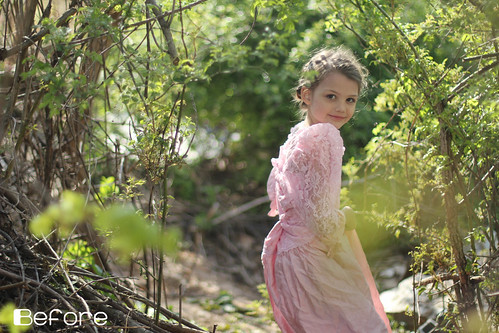
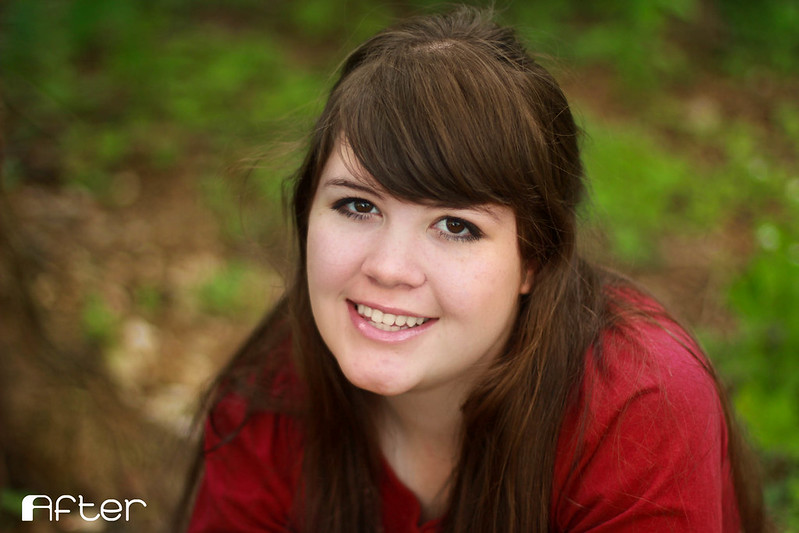
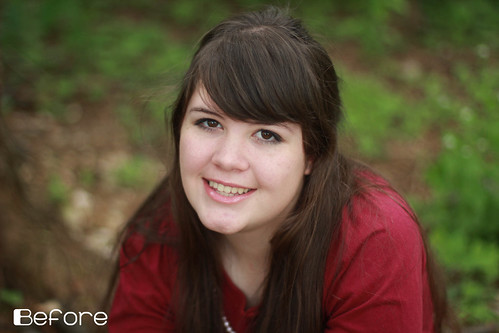
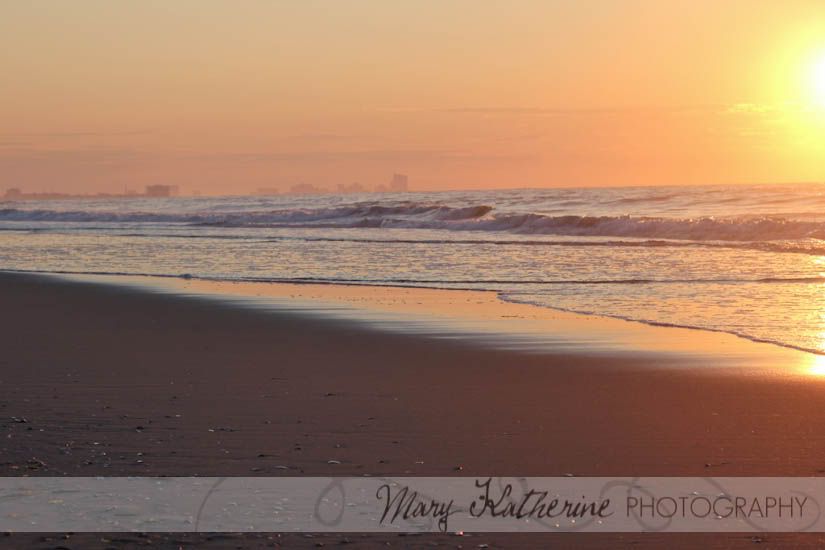
The last photo I'll share is the most recent one, taken just a few days ago and you should recognize it from my last post. SOOC:
 A nice picture, but lacking the "POP" that should accompany great images.
 After editing:
Basically I:
1) played with the levels
2) played with the colors (warmed them up)
3) then decided I wanted them a little warmer, so I used the cross process tool at I think 85%.
4) I sharpened her clothes and the umbrella
5) I lightly airbrushed her skin
6) I strongly airbrushed the background
7) I added my watermark.

Thanks for looking!
~Mary Kate

Wednesday, August 17, 2011

Texture Time

I'm participating in Edit Me again. This is the new week.


My Reflection of Something


Here's the lovely original photo:
 I decided to play around with textures, I don't usually like the effect of textures but I really like how this came out.
My edit:
Basically I did what I would normally do for a photo.
1) Played with the exposure, levels and colors until it looked good
2) used the sharpening tool to sharpen the photo
3) play with the colors a bit more.
but even after I had done those three steps, I felt like it was still lacking something. So I decided to go against what I normally do and try a texture. On picnik you have limited choices for textures and this was the best one. Then I over-layed it so that it didn't drown out the picture.
The last thing I did was add the slight border of sepia.
I hope you like it as much as I do!
~Mary Kate

More editing!

I just found this other photo challenge, well actually it's an edit challenge. Sort of like i heart faces fix-it-Fridays. Anyway, you download the photo and edit it and then enter it. I would have done it tomorrow, but the I have an hour left to link up so I'm doing it now.


My Reflection of Something


This is the original picture we had to edit:
Personally I think this is already an amazing photo and that it hardly had to be edited. I've never been one for crazy editing, so I stayed on the more simple side and this is what I came up with:
I don't have photoshop (or any editing software) so I use picnik.com. So I'll try to explain best I can how I edited this.
1.) I played with the levels darkening the dark clouds, water and boat and lightening the sky.
2.) I used played with colors until the water and dark clouds were the right shade and the light sky stayed the same beautiful shade of orange that it was in the original, except I brought out the color more.
3.) And lastly I used the sharpening tool (which on picnik is called "mascara") to sharpen the whole image, especially the boat, water and light clouds.
See, I told you this barely needed any editing at all!
Love,
Mary Kate

Tuesday, August 16, 2011

When the Magic Happens

I think a lot of people assume you just need a good camera to get a good photo. And it's true a good camera does help capture a great image, but you also need to know how to edit well. Personally I think editing is at least 1/2 of what makes a great image. Even by using an online editor like picnik.com and not photoshop, editing makes my pictures look so much better. Put it this way: taking the picture is the rough draft, and editing makes it the final draft. And the rougher the rough draft is, the harder it is to make it a good final draft.

Anyway that's my little spiel on editing. So now on to Touch Up Tuesday.


Touch Up Tuesday's at the Paper Mama


1.) Making it Warmer
This isn't a bad image, it's just rather flat. But after uploading to picnik and doing the magic:

ah...much better. Basically I warmed up the colors, played with the exposure, used the sharpening tool (which is oddly named "mascara") and ta-da! There it is looking much more alive :)

2.) Crispier the Better
Not a bad photo, but again, by it's self it's a little flat, the colors are dry.


What a nice difference. Again I just played with the exposure till it looked good, warmed the colors, brightened the colors and used the sharpening tool.

30 Day Challenge
Day 22 {August 15}

Day 23 {August 16}
On my summer reading book "The Once and Future King"


Day 23 {August 15}
I've wanted to do this for a while now and so I just decided to do it.

Day 24 {August 16}
After shopping for school supplies and completely organizing my desk, my pen holder looks like this.
 

Love,
Mary Kate